
Preparing a schedule in Primavera P6 has traditionally been a time-consuming task, requiring manual data entry without the flexibility of formulas or linked spreadsheets. Understanding the concept of importing data from spreadsheets to Primavera P6 is crucial for several reasons. However, the time estimates for building a baseline schedule with resource and cost loading are generally as follows:
-
- Simple Project: 2-3 weeks (approximately 200 activities).
- Moderate Project: 3-5 weeks (approximately 1,000 activities).
- Complex Project: 6 weeks or more (above 1,000 activities).
Benefits of Importing data from Spreadsheets to P6
- Time Efficiency: Significantly reduces the time required for data entry.
- Accurate Calculations: Enables the use of spreadsheet formulas for precise results.
- Error Reduction: Minimizes data entry errors through automated processes.
- Consistency: Ensures a consistent and straightforward process.
- Ease of Data Handling: Simplifies data management and manipulation.
- Reviewability: Facilitates easy review and validation of calculations.
- Standardization: Allows for the establishment of standard working procedures.
Challenges of This Method
- Attention to Detail: Requires meticulous attention to ensure data accuracy.
- Excel Proficiency: Necessitates a strong knowledge of Microsoft Excel.
- Troubleshooting: Can be challenging to identify and resolve errors.
Key Concepts and Steps for Importing Data to P6
In the following example, we will import budgeted units (man-hours) for a specific set of activities that have been calculated in a spreadsheet.
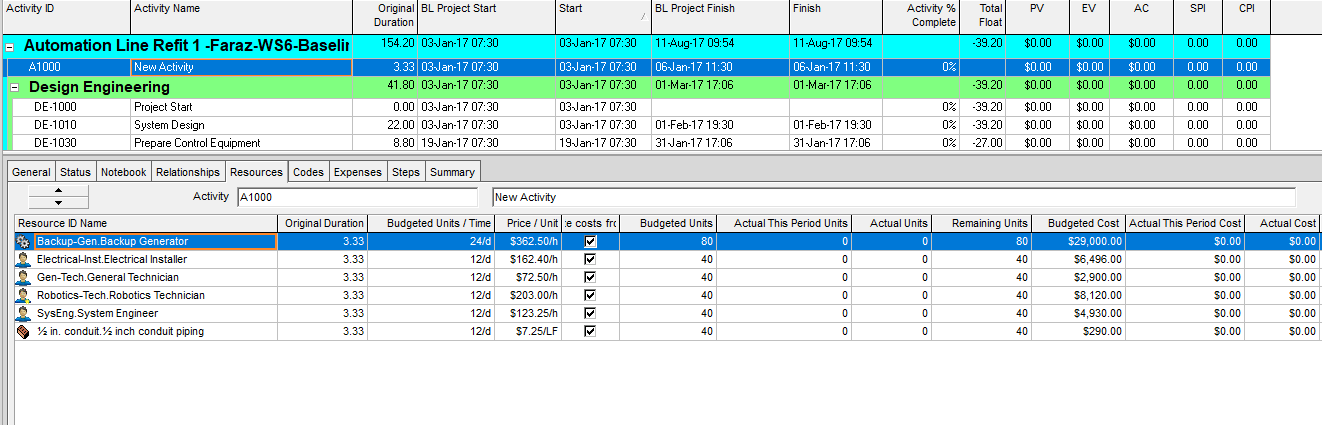
Step 1: Make a dummy activity in the project & assign all the resources to the dummy activity. Here you can see the dummy activity as “New Activity” (Note that the resources should be defined prior to this step)
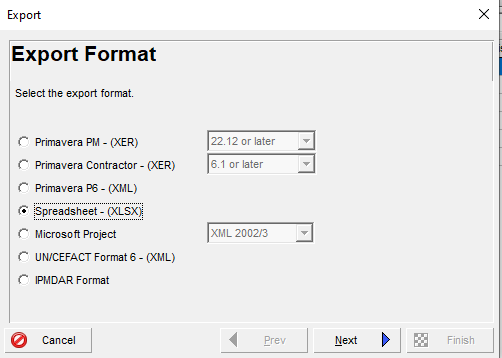
Step 2: Export to Spreadsheet (XLSM)
- Go to Files -> Export: Open Primavera P6, navigate to “File” in the top menu, and select “Export”.
- Select Spreadsheet (XLSM): Choose “Spreadsheet (XLSM)” from the export format options.
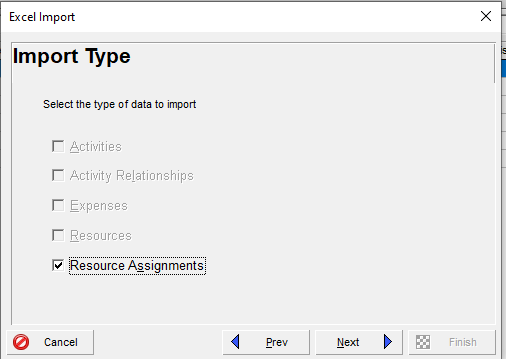
- Click Resource Assignments: Select “Resource Assignments” as the type of data to export.
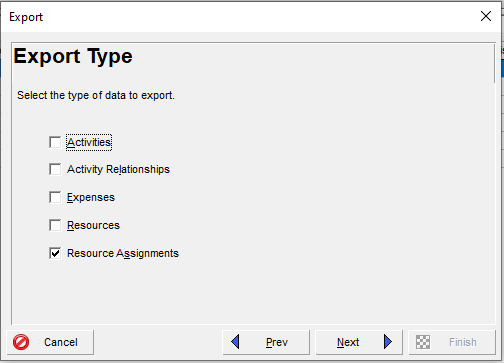
- Check Export: Ensure the “Export” option is checked for resource assignments data.
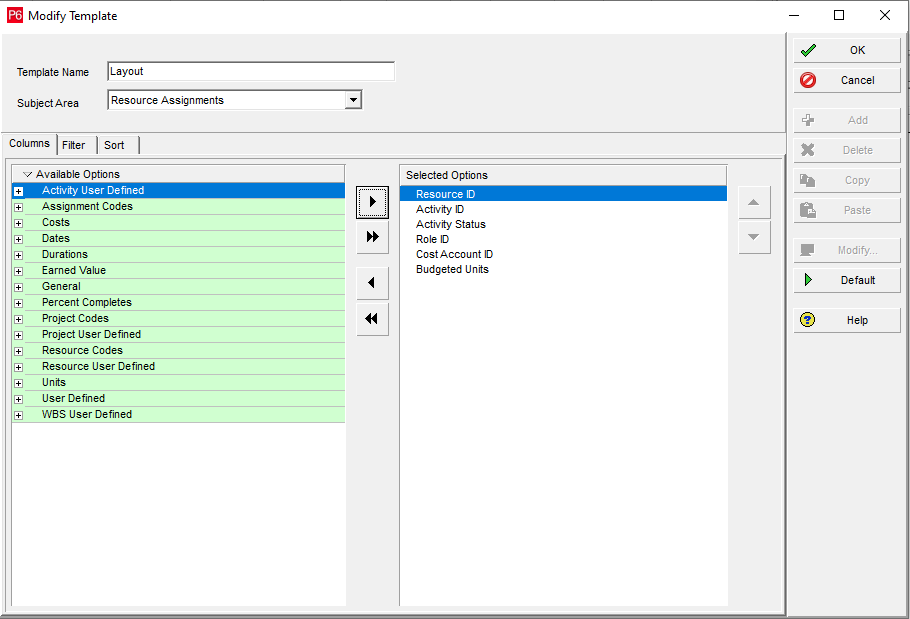
- Select Template: Modify a predefined template by selecting it and then click on modify button.
Note: Template should be modified in the following format –
- Choose File Location: Specify the folder on your computer where the exported file will be saved.
- Next & Finish: Click “Next” to proceed, review your selections, and click “Finish” to complete the export process.

Step 3: Open the exported spreadsheet, copy Activity ID, Resource ID & Budgeted Units as required. (Ensure that each Resource ID is correctly assigned to its corresponding Activity ID and verify that the Budgeted Units are accurately calculated)
Step 4: Change the format of duration cells to Text.
Step 5: Maintain Activity Status as “Not Started”. (As the project is in a baseline stage all the activities should be not started)
Step 6: Utilize “d” in the “Delete this row” column to remove the dummy activity resources.
Initially, we added a dummy activity and resources for the purpose of exporting data. However, when importing the data back, it’s crucial to remove these dummy activity resources. To do this, type “d” in the “Delete this row” column to delete the resources during the import process.
Note: Your Resource Assignment list should resemble the following format:
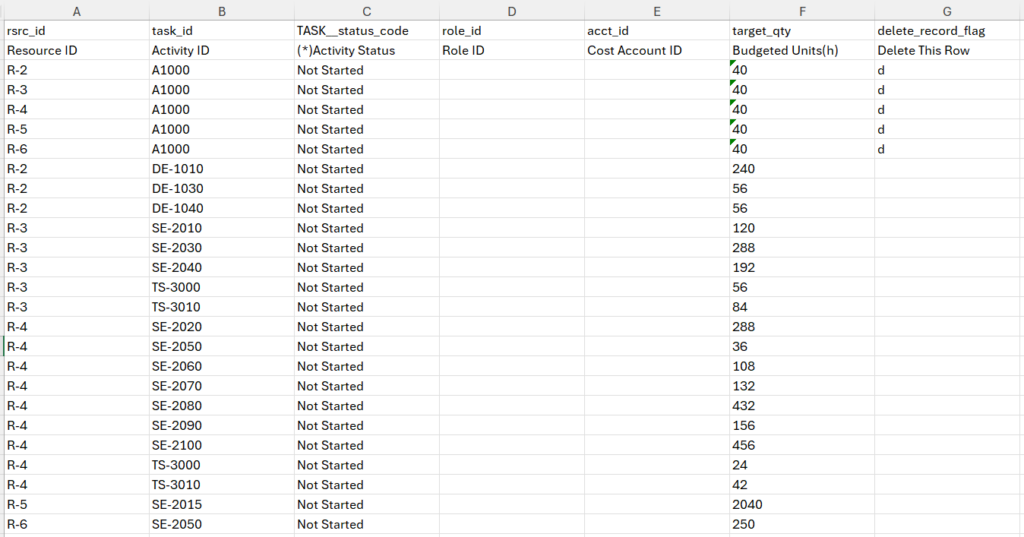
Important Note:
- Users can edit the Activity ID, Resource ID, and Budgeted Units columns
- Activity Status will typically remain as Not Started
- To remove an existing resource, users can input “d” in the “Delete this row” column
- Make sure the Budgeted Unit column is converted to “text” format
- Activity ID should not have space in front if copied from P6
Step 7: Save the spreadsheet and import it into your Primavera P6 project.
- Go to Files -> Import: Open Primavera P6, navigate to the top menu, select Files, and then click on Import.
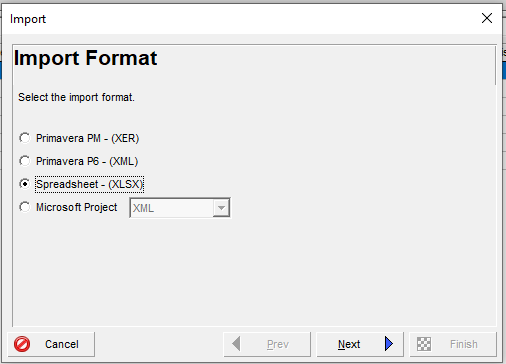
- Select Spreadsheet (XLSM): In the import options, choose Spreadsheet (XLSM) as the file format for the import process.
- Select the file: Browse your computer to locate and select the XLSM file you want to import.
- Check Resource Assignments: Ensure that the Resource Assignments option is checked to include the resource data in the import.
- Import to the existing project: Choose to import the data into an existing project, ensuring the data is correctly integrated.
- Click Finish: Complete the import process by clicking the Finish button.
Key Takeaways
Accurate Budgeted Unit Calculation: Ensure that the budgeted units for each activity are calculated correctly prior to the importing data to P6.
Maintain Spreadsheet Integrity: Do not add any additional sheets to the exported spreadsheet to avoid import errors.
Resource Definition and Assignment: Define resources in Primavera P6 and assign them to a placeholder activity before importing the corresponding resource values.
Consistent Import/Export Process: Utilize the same import and export options for activities, duration, and relationships. Ensure you select the appropriate export option and correct template for successful re-import.
After establishing a standard procedure and ensuring the calculation sheet in the spreadsheet is properly formatted, importing data into Primavera P6 becomes a straightforward process. This approach is highly efficient and significantly reduces the risk of clerical errors.
